
Introduction
As part of a small working group I have been working on how to demonstrate some of the Cisco solutions from a cross-architectural perspective. If you are not familiar with the internal structure for our pre-sales organisation we have account teams that cover all the technologies and then teams that specialise in the specific architectures;
- Data Centre
- Enterprise Networking
- Collaboration
- Security
It was decided that it would be good to show and discuss some of these in one of the UK&I TechHuddles with the theme of connecting the workplace.
When deciding what to cover the criteria that I set myself was;
- A solution to a common problem organisations have
- It must we a working example without smoke and mirrors
- To incorporate technologies and products I don’t use in the ‘day job’
The idea that came to mind was employee on-boarding.
UPDATE: The videos from the Reading session is now available and the sessions have been written up in the Cisco blog.
So how do organisations generally, in my experience, on-board new employees;
- Fill in some spreadsheets
- email different teams
- ask the last person that came into the team what they did
- Did I mention spreadsheets?
- Hunt down people that might know
- Hope you haven’t forgotten anything!
Realistically today we all expect to launch our web browser, click a few times and then have what ever we wanted delivered! Outside of the business world this is defiantly the expectation with our on-demand, self-service oriented lives yet when we step back into work we don’t quite have the same experience. I actually wrote a post about this a couple of months ago on the Cisco blog site (http://gblogs.cisco.com/uki/i-want-it-now/).
As a result I wanted the example I created to have an easy consumption model requiring minimal input from the requester and then automating the rest.
During the session I split the demo into three logical sections (presented as vidoes due to the complexity of setting up access points in remote locations to connect to the lab), I will detail in the following section how I achieve the example.
The slide deck that we used on the day can be found here. The YouTube recording of the Reading session is here;
Demo 1 - Request new user
The first part shows an end-user requesting both a permanent member of staff and contractor new user account. All that is required from an input perspective is the first and last name, a user type and the office location. Based on the input information an automated process will be kicked off using templates depending on the type of employee selected.
Demo 2 - New user connect to the network
Now that the user accounts have been created I show the two new employees connecting to the same corporate SSID using the new credentials. It shows the full time employee can browse the whole Intranet including R&D pages however the contractor does not have the access rights to access the R&D section (being redirected to a forbidden page).
Demo 3 - Introduce the new employee
Joining a new organisation and/or office is always daunting, especially if you don’t know anyone else. Would it be nice that as part of the process you are introduced into the office social spark room? It will also post a picture (taken from the ‘security badge’ system). This will help existing members of staff recognise you and know your name so they can introduce them selves and you are also able to get involved with any social events or discussions.
Technical Details
Now that you have seen the 3 examples you are probably wondering what is actually happening here?
The overall connectivity flow, including specific products/solutions, is as follows. It should be noted that the vast majority of this demo was created using out of the box functionality and integrations, the main area that involved customisation was the Spark integration;
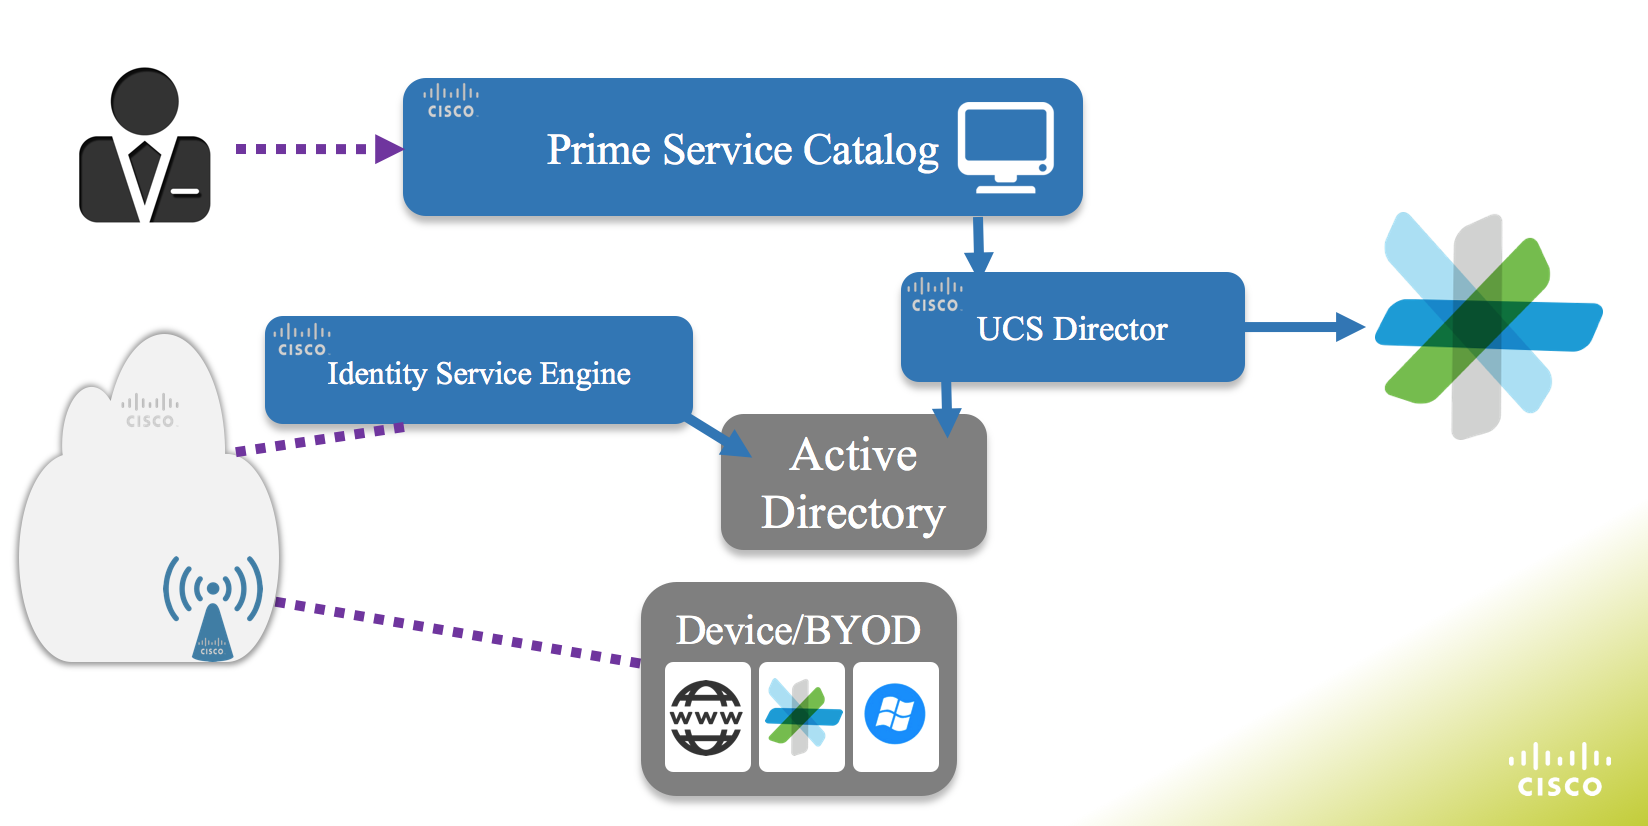
A catalog item has been published into Prime Service Catalog using the out of the box integration with UCS Director using its Rest API.
The automation engine of this demo is UCS Director (version 5.3), it is used to create the new user accounts in Active Directory as well as post a welcome message into a Cisco Spark room. A number of steps are followed when the workflow is executed;
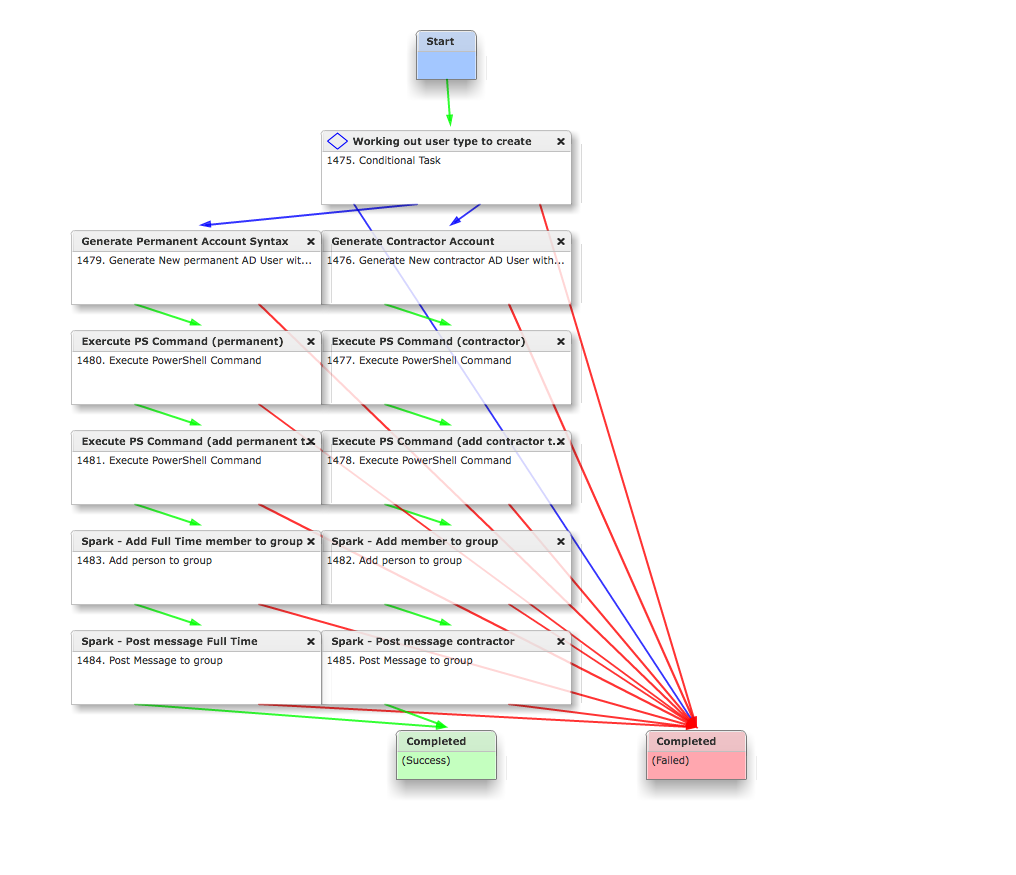
Based on the input either the full-time employee or contractor path will be followed (I accept that this could be created in a more efficient way, this was created as a proof of concept and evolved over time), this uses a conditional task (1475).
The next task (1479 or 1475 depending of type of employee) is a CloupiaScript that takes the various inputs and prepares it for later tasks. The specific actions are;
- Generate username format from First and Last name
- Generate email format
- Generate Powershell syntax to add user
- Generate Powershell syntax to add user to specific group
- Generate Powershell syntax to set user password
- Generate message to be posted into Spark Room
The example script is (also here);
UPDATE: I have updated the scripts, of the latest please go to with my Github account or the Communities page link.
//=================================================================
// Title:               TechHuddle Full Time
// Description:         This is part of the Jan 2015 Cisco TechHuddle
//                      demo. It is used as a custom task in UCS Director
//                      to workout the correct syntax for a number of
//                      powershell commands and Spark messages.
//                      It will take a number of inputs and create the
//                      required syntax which is avalible as an output to
//                      be used by other tasks in the workflow.
//
// Author:          	Rob Edwards (@clijockey/robedwa@cisco.com)
// Date:                18/12/2015
// Version:             0.1
// Dependencies:
// Limitations/issues:
//=================================================================

logger.addInfo("Taking the input parameters and making them useful");
// Take inputs
var Pass = input.Pass;
// Take first and last name and create an account user name by taking the 1st charactor of the 1st name and whole last name
var shortname = input.FirstName.substr(0,1) + input.LastName;
// Generate email address based on inputs
var email = input.FirstName + "." +input.LastName + "@miggins.com";


// Powershell syntax to create a new user in AD
//output.PowerShell_ADUser = "New-ADUser -Name \"" +input.FirstName + " " + input.LastName+ "\" -Enabled 1 -GivenName \"" + input.FirstName + "\" -Surname \"" + input.LastName + "\" -SamAccountName \"" + shortname +"\" -UserPrincipalName \"" + shortname + "\@miggins.com\""
output.PowerShell_ADUser = "New-ADUser -Name \"" +input.FirstName + " " + input.LastName+ "\" -Enabled 1 -GivenName \"" + input.FirstName + "\" -Surname \"" + input.LastName + "\" -SamAccountName \"" + shortname +"\" -UserPrincipalName \"" + shortname + "\@miggins.com\"";
logger.addInfo("Created Powershell syntax to create a new user in AD");
logger.addInfo(output.PowerShell_ADUser);
// Powershell syntax set user password in AD
output.PowerShell_ADPassword = "Set-ADAccountPassword -Identity " + shortname + " -Reset -NewPassword (ConvertTo-SecureString -AsPlainText \"C15co123\" -Force)"
logger.addInfo("Created Powershell syntax set user password in AD");
logger.addInfo(output.PowerShell_ADPassword);
// Powershell syntax to put a user in AD group
output.PowerShell_ADGroup = "Add-ADGroupMember -Members \"" + shortname + "\" -Identity permanent";
logger.addInfo("Created Powershell syntax to put a user in AD group");
logger.addInfo(output.PowerShell_ADGroup);

output.Email = email;
logger.addInfo("Created email variable to be passed to other tasks");
logger.addInfo(output.Email);

output.SparkMessage = "Please welcome " + input.FirstName + " " + input.LastName + " to the Manchester office. They are joining us in a full time capacity.";
logger.addInfo("Created Spark Message");
logger.addInfo(output.SparkMessage);
Once the various outputs are created we configure active directory.
Active Directory Integration
The active directory configuration is acheievd using UCS Director powershell capabilites (here). The out of the box ‘Execute PowerShell Command’ was used. The syntax that was generated in the previous CloupiaScript was passed into the task and executed against the AD server. I made use of three powershell ‘cmdlets’ that already existed in the server;
- New-ADUser (https://technet.microsoft.com/en-us/library/ee617253.aspx)
- Set-ADAccountPassword (https://technet.microsoft.com/en-gb/library/ee617261.aspx)
- Add-ADGroupMember (https://technet.microsoft.com/en-gb/library/ee617210.aspx)
Spark Integration
Once the accounts have been created in active directory the users are added to Cisco Spark Room via its Rest API. This is the are customisation was done and involved creating a number of CloupiaScripts to interact with Spark. These have been shared and documented on the Cisco communities site (https://communities.cisco.com/docs/DOC-64423). As I have documented this elsewhere I wont go into detail here.
The documentation provided for Sparks Rest API is very good and also some great introduction courses in DevNet (https://developer.cisco.com/site/spark/) to help you get up to speed (https://developer.ciscospark.com/).
Wireless LAN Controller and Identify Service Engine
The area that I do not spend time with during my day job is the WLC or ISE. I worked with a colleague to configure these. A number of CVD exist for integrating these products (http://www.cisco.com/c/en/us/td/docs/solutions/Enterprise/Borderless_Networks/Unified_Access/byoddg.html).
In the Demo the wireless Access Point (AP) is configured to use a virtual Wireless LAN Controller (WLC). The WLC is connected to ISE to allow use to authenticate the employees using their newly created AD accounts.
When the users browse to the Intranet site ISE will either allow or redirect to a forbidden page depending on which AD group the user has been added to (permanent or contractor).